I sold some timber this fall, mostly walnut some of the tops are 16" would they be of any use to a wood turner?
No forums found...
Site Related
Iowa State
College Sports
General - Non ISU
CF Archive
Install the app
Woodworkers Thread
- Thread starter AgronAlum
- Start date
No forums found...
Site Related
Iowa State
College Sports
General - Non ISU
CF Archive
You are using an out of date browser. It may not display this or other websites correctly.
You should upgrade or use an alternative browser.
You should upgrade or use an alternative browser.
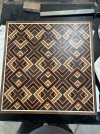
Here is a 20x20 end table I am making. The top of the "I" had a little red bleed into the yellow. Other than that it has turned out pretty good.
Hand painted? Looks good.
Thanks. No, it is epoxy. I bought a Sienci MK2.5 Long Mill cnc machine and this is my first big project. Looking to get into furniture making.Hand painted? Looks good.
Thanks. No, it is epoxy. I bought a Sienci MK2.5 Long Mill cnc machine and this is my first big project. Looking to get into furniture making.
Now that you say that, I can see it when I zoom in.
The CNCd stuff is almost all you see anymore at farmers markets and other events. They must sell well.
This is my 2nd one. I started with a small Shark SD120. It was really good for small items like cribbage boards, cutting boards, small signs and what not. The one I have now has a cutting area of 52x36. I can make kitchen cabinets, funiture, large signs, and still make multiple small items. I really enjoy the process.Now that you say that, I can see it when I zoom in.
The CNCd stuff is almost all you see anymore at farmers markets and other events. They must sell well.
Very nice. What species of wood do you have in it?Just what everybody needs, another cutting board. I seem to try and make projects that I don’t have the correct tools for, but that is half the challenge. A few knife marks trying to carve a ham or parting a chicken should hide most of the flaws.
Thank you. Background is walnut, the purple heart squares are outlined with red oak and the mahogany squares are outlined with Maple. Part of the challenge is to have uniform colors on any exposed cuts. Purple heart is pretty consistent, but mahogany can have almost whitish areas and maple can have darker colors. Red oak is generally pretty uniform but walnut varies greatly— and there are just too many pieces to try to keep things uniform.Very nice. What species of wood do you have in it?
Last edited:
Good lord.... nice workJust what everybody needs, another cutting board. I seem to try and make projects that I don’t have the correct tools for, but that is half the challenge. A few knife marks trying to carve a ham or parting a chicken should hide most of the flaws.
Are you wearing a kilt?
(Also, nice table.)
Thanks. It looks like I am wearing a kilt, but no, i am not.Are you wearing a kilt?
(Also, nice table.)
I recently had the caps on the bottom of columns outside replaced using 1x16 cedar boards on all four sides. What was taken off had an edge profile on the top. I'd like to do something similar prior to the columns getting repainted so they astatically match the rest of the column a little better vs the hard 90 degree edge the replacement boards have. What would that type of profile/detail be called and what would be the easiest way to do it and get a uniform result?


That cut is called a “cove”. The easiest way to replicate that would be with a router and a cove bit with a bearing. My routers only have quarter inch collets and my cove bits only go up to 3/8 depth of cut. If your depth is deeper, you may have to find a router with a half inch collet to accept larger bits. would have been easier to do before application on a router table, but still can be done if they are already attached. If I were going to attempt it, I would make several passes at increasing depths until I achieved the look I wanted.I recently had the caps on the bottom of columns outside replaced using 1x16 cedar boards on all four sides. What was taken off had an edge profile on the top. I'd like to do something similar prior to the columns getting repainted so they astatically match the rest of the column a little better vs the hard 90 degree edge the replacement boards have. What would that type of profile/detail be called and what would be the easiest way to do it and get a uniform result? View attachment 141809
I recently had the caps on the bottom of columns outside replaced using 1x16 cedar boards on all four sides. What was taken off had an edge profile on the top. I'd like to do something similar prior to the columns getting repainted so they astatically match the rest of the column a little better vs the hard 90 degree edge the replacement boards have. What would that type of profile/detail be called and what would be the easiest way to do it and get a uniform result? View attachment 141809
It can be done with either a cove bit and a router or just putting cove trim on top of the 1x.
You can get these in different depths and dimensions or you can just buy cove moulding, fasten and paint. If you're painting a solid color, the premade moulding is going to be easier.

I
That cut is called a “cove”. The easiest way to replicate that would be with a router and a cove bit with a bearing. My routers only have quarter inch collets and my cove bits only go up to 3/8 depth of cut. If your depth is deeper, you may have to find a router with a half inch collet to accept larger bits. would have been easier to do before application on a router table, but still can be done if they are already attached. If I were going to attempt it, I would make several passes at increasing depths until I achieved the look I wanted.
If the boards are already attached, getting a router with a bearing bit in there would be difficult. I’d suggest removing the boards to do it well.
And if they are painted, I cannot recommend pvc trim enough for the bottom of columns. Helps with the rotting wood problem. Should be able to buy that profile.
I would think it would be rather easy to ride the faces of the board with the router base and let the bearing ride the top.If the boards are already attached, getting a router with a bearing bit in there would be difficult. I’d suggest removing the boards to do it well.
And if they are painted, I cannot recommend pvc trim enough for the bottom of columns. Helps with the rotting wood problem. Should be able to buy that profile.
that would be a Cove Bit. Edited for correctness. My bad.I recently had the caps on the bottom of columns outside replaced using 1x16 cedar boards on all four sides. What was taken off had an edge profile on the top. I'd like to do something similar prior to the columns getting repainted so they astatically match the rest of the column a little better vs the hard 90 degree edge the replacement boards have. What would that type of profile/detail be called and what would be the easiest way to do it and get a uniform result? View attachment 141809
Attachments
Last edited:


